
Meet your kit, then light your first LED
Before we build anything, let's get to know the four parts you'll use in almost every circuit you ever build. Then we'll wire your first LED, step by step.
The four basic components
1. The breadboard
A breadboard lets you build circuits without soldering. It looks like a grid of holes, but it's actually a set of hidden metal strips underneath. Holes in the same column (letters A–E, or F–J) are secretly connected to each other. The long red and black lines running along the top and bottom edges are the power rails — the "+" rail carries power, the "−" rail returns it.
2. The LED (Light Emitting Diode)
An LED lights up when power flows through it — but only in one direction. Look closely: one leg is longer than the other. The long leg is the anode (power goes in here), and the short leg is the cathode (power goes out here). Put it in backwards and it simply won't light up — that's normal, just flip it around.
3. The resistor
LEDs are delicate — too much power flowing through them burns them out instantly. A resistor slows the flow down to a safe level. Resistors don't care which direction they're wired, so you can't put one in backwards.
4. Jumper wires
These are just short wires with solid pins on each end, used to connect one point on the breadboard to another — like connecting the power rail to your circuit.
How current flows in this circuit
Power always needs a complete loop to do anything — out from the + side of the battery, through your components, and back to the − side. If any part of that loop is broken, nothing happens. That's really all a "circuit" is: a complete loop.
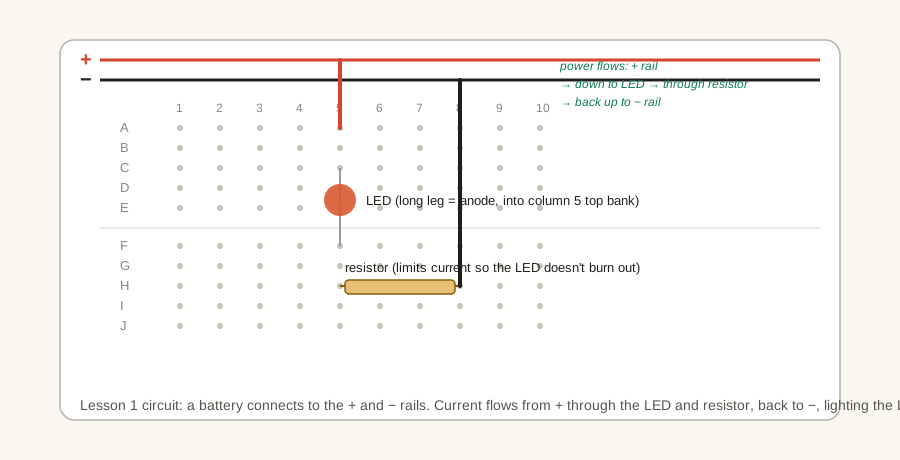
Step-by-step: wire it yourself
- Place your LED so its two legs sit in two different rows, straddling the center gap of the breadboard (this keeps the two legs on separate, unconnected sets of holes).
- Run a jumper wire from the + power rail to the same column as the LED's long leg (anode).
- Place your resistor so one leg sits in the same column as the LED's short leg (cathode), and the other leg sits a few columns over.
- Run a jumper wire from the resistor's other leg to the − power rail.
- Connect your battery pack to the + and − rails. Your LED should light up!
- Flip the LED around — it may be backwards.
- Double check both jumper wires are firmly in the rails, not the row grid.
- Make sure the resistor and LED share the same column where they meet.